Setting up server licenses🔗
General🔗
This guide describes how to install or set-up server/shareable licenses for Modelon products. After purchasing a license, you should receive a license file with the file extension .lic. It can be opened with a text editor. This file must be put in a specific folder for the application to find it.
A server license file provided by Modelon will look like the example below:
#Please do not delete this comment line.
SERVER this_host AF10D89C8E90
VENDOR modelon
USE_SERVER
INCREMENT ModelonBaseLib modelon 2021.1231 31-dec-2021 5 \
ISSUER="Modelon AB" ISSUED=3-sep-2020 BORROW=420 \
…
where, AF10D89C8E90 is the host-id or MAC address of the server/computer where the license manager will run.
Using shareable licenses requires configuration on the server (computer where the license manager process will run) as well as the client (computer where the Modelon product/application will run).
Instructions for server-side configuration🔗
The server-side configuration involves editing the license file as well as setting up the license server/manager process. This is usually done by the IT department.
Configure the license file🔗
-
Open the license file in a text editor and replace
this_hostwith the host name or IP address of the server machine. -
It is possible to specify the port to be used for the license manager (lmgrd.exe). If no port is specified, one of the default ports in the range 27000 to 27009 is used. To specify the port, add the port number at the end of the
SERVERline. Here is an exampleSERVERline with the port number specified:SERVER license.my-company.com AF10D89C8E90 4257 -
It is also possible to specify the port to be used for the vendor daemon (modelon.exe). This could be useful if ports have to be white-listed in the firewall. To specify the port, add the string "
PORT=" along with the port number at the end of theVENDORline. Here is an example:VENDOR modelon PORT=2800
Set up the license manager🔗
The license manager for Modelon licenses can be set up on server machines running Windows or Unix.
Instructions for Windows🔗
The required files for setting up the license manager is usually distributed with the Modelon product (in <installation folder>\license_tools). They can also be downloaded using the link below:
https://downloads.modelon.com/transfer/update/FlexLM/license_tools_Win_11.19.zip
A password is required to access the files. Reach out to Modelon representative, or Send a request to support@modelon.com
The files include:
- lmgrd.exe (license server)
- modelon.exe (vendor daemon)
- lmutil.exe (configuration and utility functions)
- lmtools.exe (Windows GUI for setting up the license server as a Windows service)
To configure a license server manager (lmgrd) as a service, you must have Administrator privileges. The service will run under the Local System (LS) account. This account is required to run this utility as a background service in Windows.
-
Make sure that vendor daemon modelon.exe is in the same folder as the license server, lmgrd.exe.
-
Run lmtools.exe from command prompt in the directory in which you have installed the tools.
-
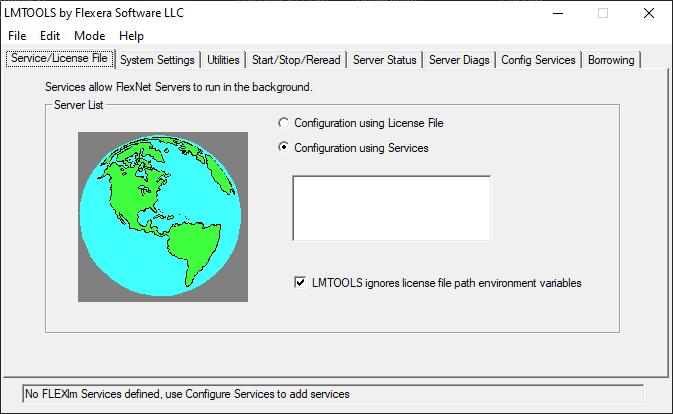
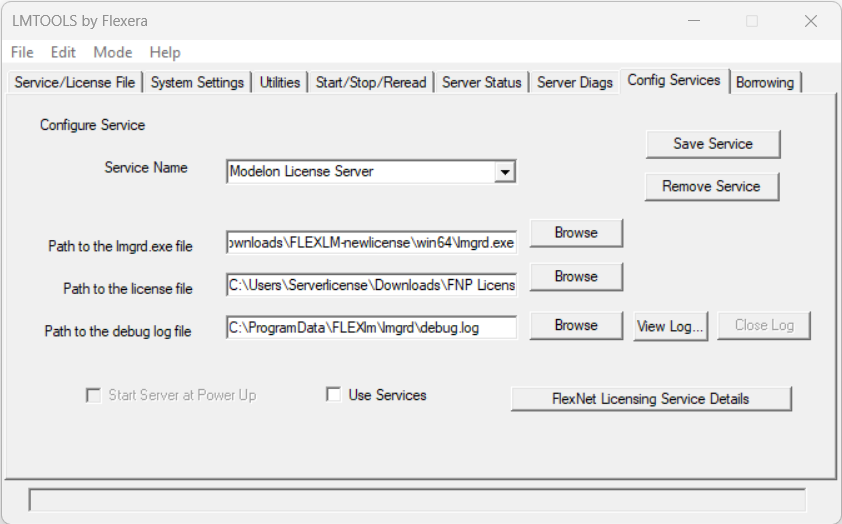
Click the Configuration using Services button, and then click the Config Services tab (see figure below).
-
In the Service Name field, type the name of the service that you want to define, for example,
Modelon License Server. -
In the Path to the lmgrd.exe file field, enter or browse to lmgrd.exe.
-
In the Path to the license file field, enter or browse to the server license file. If you have multiple license files, you can instead specify a path to a folder where you keep your license files. When doing so, all the licenses in the folder will be available on the server.
-
In the Path to the debug log file, enter or browse to the debug log file that this license server should write. Prepending the debug log file name with the '
+' character appends logging entries. This feature is only available when running from the command prompt. If no path is entered, the default location for the debug log file is used, which is:C:\ProgramData\FLEXlm\lmgrd\debug.log. When specifying a different location, make sure to specify a fully qualified path.
Note
Make sure you have write access to the debug log file.
-
Make this license server manager a Windows background service by selecting the Use Services check box. Optionally, you can configure the license server to start at system startup time by selecting the Start Server at Power Up check box.
-
To save the new
Modelon License Serverservice, click Save Service.
-
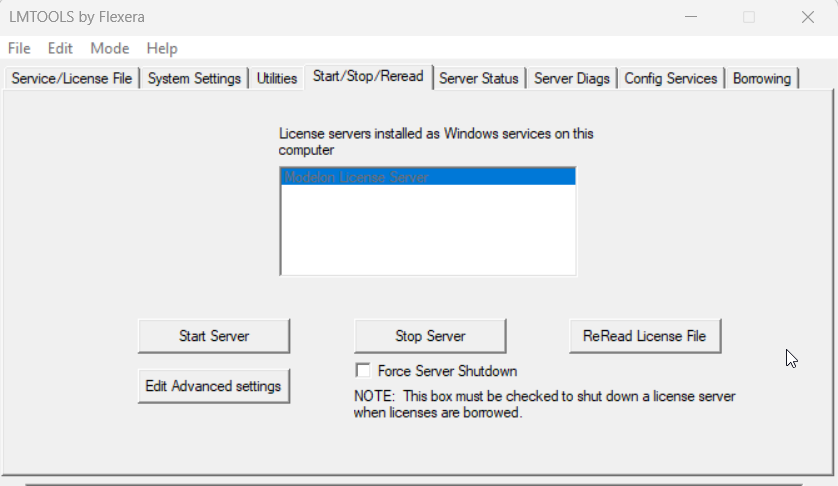
Click the Service/License File tab. Select the service name from the list presented in the selection box. In this example, the service name is
Modelon License Server. -
Click the Start/Stop/Reread tab. Start
Modelon License Serverby clicking the Start Server button.Modelon License Serverstarts and writes its debug log output to the file specified in the Config Services tab.
-
Server status and server diagnostics (for example, available license files and features, whether vendor daemon is up, how many licenses are checked out, etc.) can also be made under corresponding tabs.
Instructions for Unix🔗
The required files for setting up the license manager is usually distributed with the Modelon product (in <installation folder>\license_tools). They can also be downloaded using the link below:
https://downloads.modelon.com/transfer/update/FlexLM/license_tools_Lin_11.19.zip
A password is required to access the files. Reach out to Modelon representative, or Send a request to support@modelon.com
The files include:
- lmgrd (license server)
- modelon (vendor daemon)
- lmutil (configuration and utility functions)
-
The license tools mentioned above are available in 32 and 64-bit flavors. Use the correct version depending on your system architecture.
-
Make sure that vendor daemon modelon is in the same folder as the license server, lmgrd.
-
Start lmgrd from the UNIX command line using the following syntax:
lmgrd -c license_file_list -l [+]debug_log_path
Note
The flavor of linux used may require certain libraries to be installed first
where,
-
license_file_listis either the full path to a license file or a directory containing license files where all files named*.licare used. If thelicense_file_listvalue contains more than one license file or directory, they must be separated by colons. -
debug_log_pathis the full path to the debug log file. Prependingdebug_log_pathwith the '+' character appends logging entries.
Note
- Make sure you have write access to the debug log file.
- You may need to provide execution permissions for the license tools. This can be done by opening a Terminal in the folder with the tools and executing the command:
chmod u+x lm* mod*.
- Starting lmgrd from a root account may introduce security risks, and it is therefore recommended that a non-root account is used instead. If lmgrd must be started by the root user, use the
sucommand to run lmgrd as a nonprivileged user:su username -c "lmgrd -c license_file_list -l debug_log_path"
Ensure that the vendor daemons listed in the license file have execute permissions for username.
- If needed, the license server can be shut down using the command
./lmutil lmdown -q -forceand restarted using the command from step 3.
Three-server redundancy cluster🔗
To increase the availability of server licenses, a three-server redundancy configuration can be used. In this case, three license servers communicate and provide licenses instead of a single one. The benefit is that licenses will be supplied even if one of the servers goes down, as long as the other two are still online and can communicate with each other.
The three servers form a triad, where one is designated as master, and the other two as slaves. The master supplies all the licenses, while the slaves are passive. If the master for any reason loses connection with the slaves (such as during a system crash), one of the slaves will be assigned to master, and the previous master will be cut off from the cluster. The system admin will have to restart the old master in order for it to once again connect to the cluster. At least two servers must be connected for the cluster to be able to supply licenses.
Note
A special license is needed, and can be provided by Modelon upon request, for setting up a three-sever redundancy cluster or triad.
The triad can be configured as follows:
- Edit the triad license file, which contains three
SERVERlines. The format for the server line is as follows, where words enclosed in[...]indicate that the property is optional:SERVER hostname hostid port [PRIMARY_IS_MASTER] [HEARTBEAT_INTERVAL=seconds]
Edit the hostname for each server such that they match your hosts, and also edit the port which the triad should communicate on. Note that on a Linux system, a port number greater than 1024 should be chosen.
An example of a three-server license is given below:
    #Please do not delete this comment line.
    SERVER windows_host1 1065C0561A47 2837 PRIMARY_IS_MASTER HEARTBEAT_INTERVAL=30
    SERVER linux_host2 08002C4D5048 2837 HEARTBEAT_INTERVAL=25
    SERVER linux_host3 08002CCE527F 2837
    VENDOR modelon
    USE_SERVER
    INCREMENT ModelonBaseLib modelon 2021.1231 31-dec-2021 5 \
    ISSUER="Modelon AB" ISSUED=3-sep-2020 BORROW=420 \
    …
If the optional PRIMARY_IS_MASTER property is added to the first of the SERVER lines, then this server will always be master as long as it is connected. Note that it can only be added on the first line. The server lines can be manually rearranged without affecting the license to account for this.
An optional HEARTBEAT_INTERVAL=seconds property can be also added to a SERVER server line in order to control how long this server will stay online without any contact from another server. Valid values for seconds is 0-30. The seconds value is used to calculate the time before the server times out: timeout = (3 x seconds) + seconds - 1. Valid values for timeout are thus 0-120. Default value for seconds is 20, which results in 79 seconds for timeout.
-
Copy the edited license file such that it exists locally on each of the three servers hosts.
-
Also copy the
license_tools(lmgrd, modelon etc.) such that it exists locally on each of the three servers hosts. -
Start the servers one by one as described in Section 4.2 and Section 4.3, but with the difference that you now need to make sure that each server references the local copy of the three-server redundancy license file.
-
The servers will now connect and form the triad. Check the debug log file that was supplied during start up for server status. Note that most debug information will be written to the current master's log. Mainly connection status updates and license requests will be written to the logs for the slaves.
Instructions for client-side configuration🔗
This section contains instructions for the end user (client) of the Modelon product or application. The application can connect to the license-server and daemon either by reading a license file or an environment variable. The assumption is that the server is already up and running and that the server name or IP address to the server and the port number is already known. The IP address and the port number, if needed, should be provided by your IT personnel or license server administrator.
Configure the client license file🔗
-
Create an empty text file, and change its extension to
.lic. -
Edit the file with a text editor, and copy the following text to it:
SERVER <ip-address> ANY <port> VENDOR modelon USE_SERVER -
Change
<ip-address>to the IP address or name of the server. -
Change
<port>to the port number that is being used. If you do not have a port number, you can remove the whole string "<port>" and a Flexera default port (27000-27009) will be used.
For example, the license file should look like the following for a license server with IP address 192.168.0.12 using port 1200:
    SERVER 192.168.0.12 ANY 1200
    VENDOR modelon
    USE_SERVER
- Save the file in a convenient location.
Note
It is possible to borrow a license for a period of time from the license server. For instructions on how to do this, see license borrowing.
Install the client license file🔗
Instructions for Windows🔗
- Close the application if it is already running.
- Open the Application Data folder.
- Open the Start menu.
- Type
%appdata%and press enter. The Application Data folder should now be open. Check that its path is of the formC:\Users\<username>\AppData\Roaming.
- Create the folder
Modelon\Licenses\Serverif it does not exist already. - Put the client license file you just created in the folder
Server.
Instructions for Unix🔗
- Copy the client license file you just created to the folder
<installation folder>\Licenses\Server.
Update the license file🔗
To update the license file, you should overwrite the old license file with the new one. Ensure that the old license file is overwritten or removed from the folder since it may otherwise be used instead of the new one, and the application may fail to check out a license.
Note
You must restart the program for license changes to take effect.
Use the environment variable🔗
An alternative to specify how the application should connect to the license server is to set the environment variable MODELON_LICENSE_FILE. The value can be set to port@host, where port and host are the TCP/IP port number and host name from the SERVER line in the license file respectively. Alternatively, use the shortcut specification, @host, if the license file SERVER line uses a default TCP/IP port or specifies a port in the default port range (27000–27009).
Please feel free to contact support@modelon.com if you have trouble with any of the steps described above.