Workspace Configuration🔗
The workspace configuration page can be used to configure existing or new workspaces with projects. These projects can be local projects used in another Modelon Impact workspace, or version controlled libraries and/or Modelon Impact libraries. The page also shows an overview of all content in the workspace and the status of the working copies in which the version controlled libraries are located. The workspace configuration page can be opened from the Apps menu in an open workspace in Modelon Impact to configure or view the content of the workspace, or from the Apps menu on the Modelon Impact landing page to create and configure a new workspace.
Configure Workspace🔗
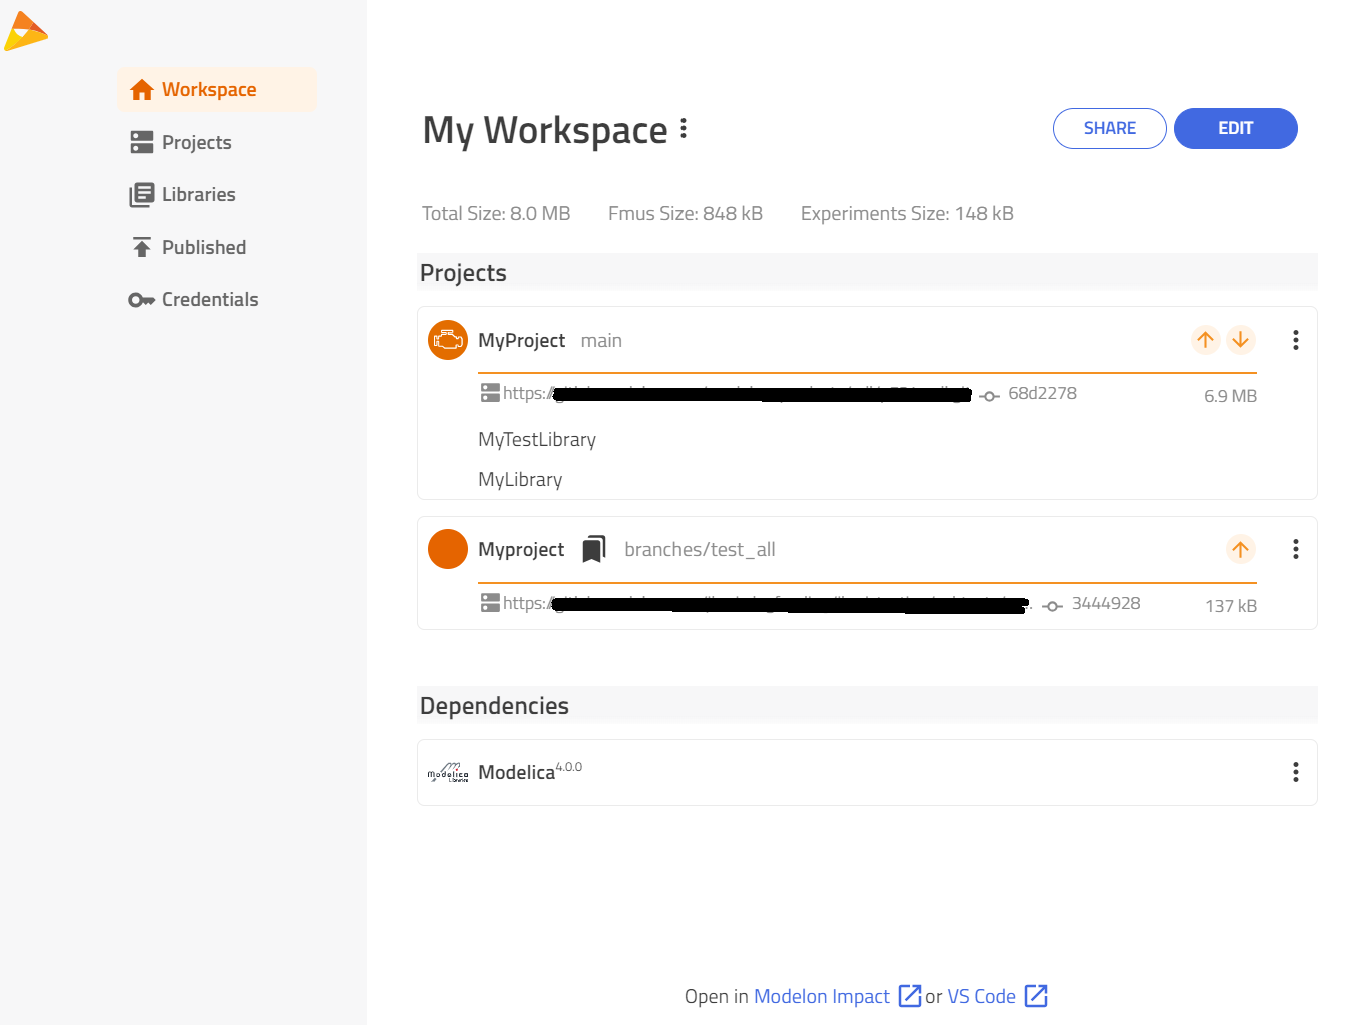
When the workspace configuration page is opened from the workspace in Modelon Impact, the content of the workspace is shown, as well as the status of any version-controlled projects in the workspace. Each project can contain one or more Modelica libraries, and/or other Modelon Impact resources like Views, Favorites, Custom functions and more. The project can be expanded to show the contents inside it, and more information about the project. To inspect the files in the project, it can be opened in Visual Studio Code(VS Code) through the menu accessible from the context menu (three dots).
There are three types of projects which can be included in a workspace:
-
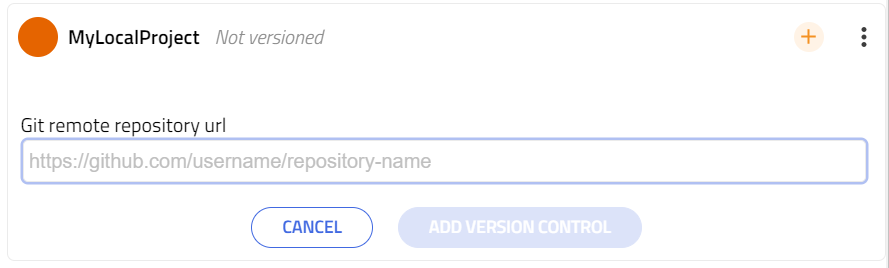
Local projects not under version control are displayed with a note "Not versioned", and a "+" icon for adding the project to version control. These are projects located only in your own user space in Modelon Impact, and this is the type of project you will get when creating a new project in Modelon Impact. By default, each new workspace created in Modelon Impact will contain a local project with the name "Project".
-
Version controlled projects shows the checked out branch from the SVN or Git repository. If there are updates to fetch, local modifications, or conflicts with the remote, this is shown with an icon next to the context menu. See more info in Work with Version Control. One working copy can contain one or more Modelica libraries.
-
Libraries are encrypted and can not be edited by the user. One example is the Modelon Impact Libraries which comes with Modelon Impact Pro. Libraries are shown with a version number.
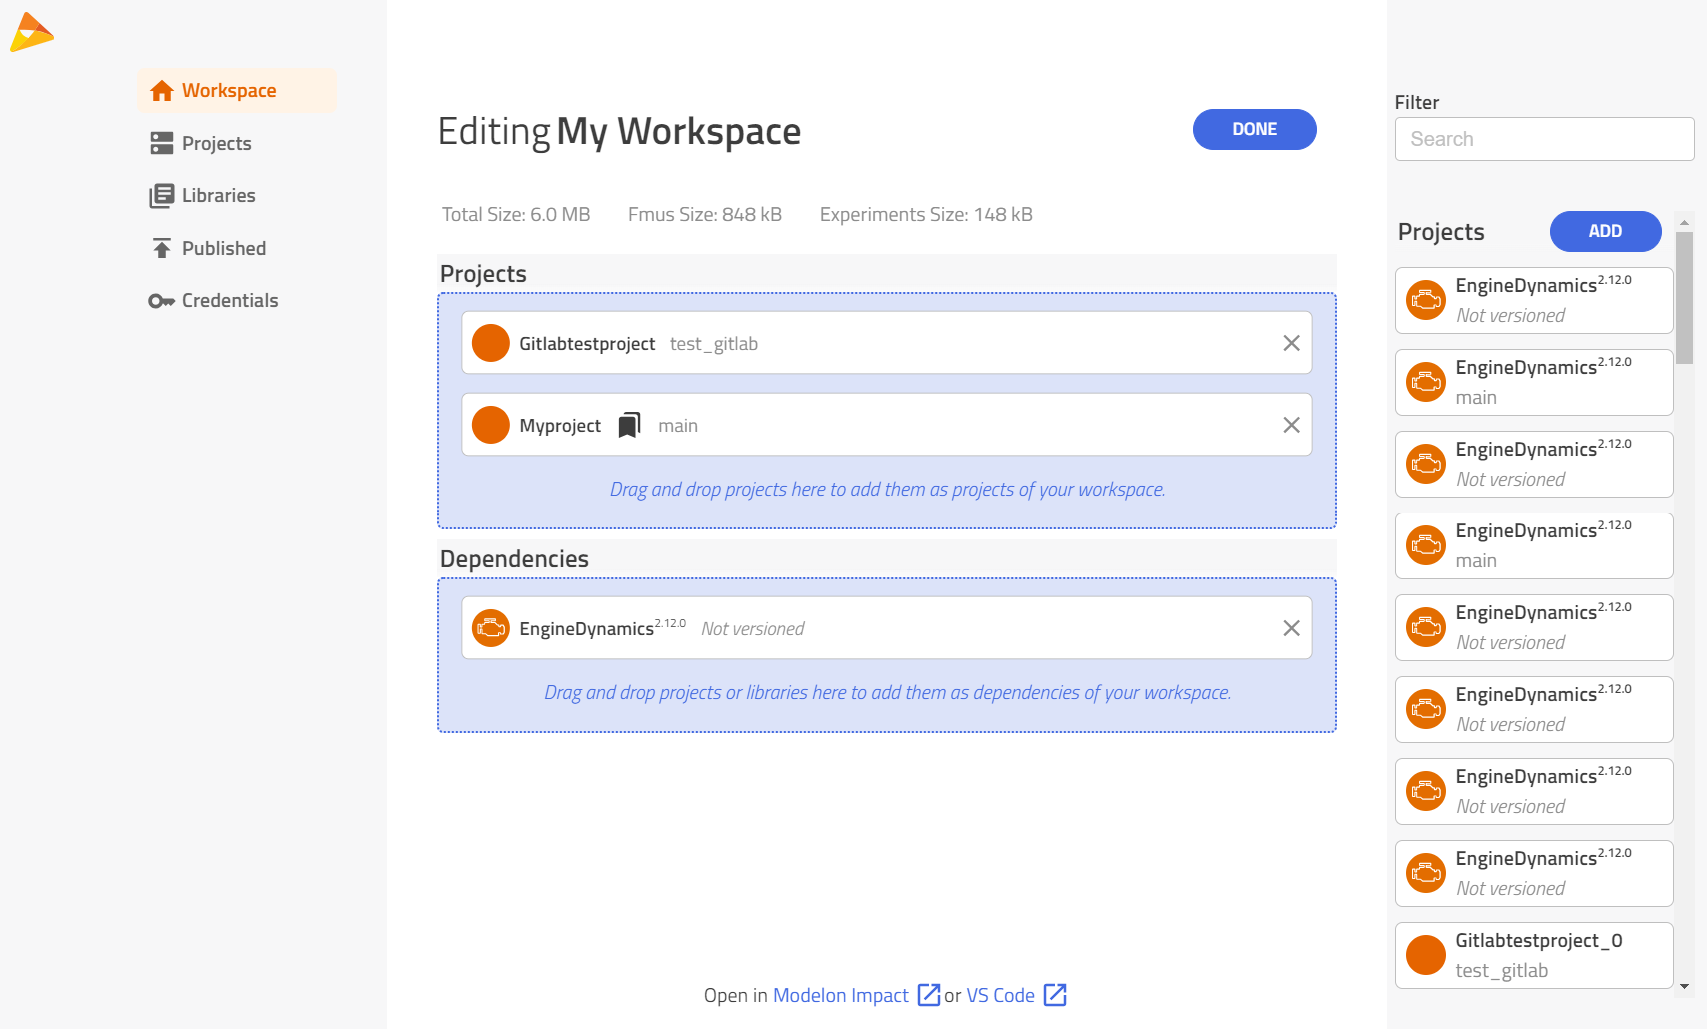
To add or remove projects in the workspace, click the "Edit" button. Available local, version controlled projects and libraries are now shown to the right, and can be dragged into the workspace as editable projects (header "Project") or read-only (header "Dependencies"). To find the project you are looking for, the filter field can be used to search for matches. To remove a library from the workspace, click the 'x' button, and it will again appear under "Available libraries". Note that projects can not be deleted from your Modelon Impact user space from this view - this is done through the Project Explorer.
When dragging in a project that is dependent on another project, the dependency is automatically added to the workspace.
Note
Modelon Impact does not allow more than one project or Modelica library with the same name in a workspace, which is why this is restricted when configuring a workspace.
Note
The libraries distributed with Modelon Impact are read-only, which is why they can not be added as editable in a workspace.
Note
Select 'Only show latest version' to filter the library list and display only the most recent version of each library.
If you are missing any version controlled projects, click the "Add" button to checkout/clone them to your Modelon Impact user space. If you want to add them to the workspace after checkout, make sure to use the checkbox for this.
Check out/Clone Version Controlled Projects🔗
Pre-requisite
- Git or SVN account and repository url to check out are needed to complete these steps
- Git urls are often similar to https://github.com/my-organization/my-repo or https://gitlab.com/my-organization/my-subgroup/my-repo.git.
- SVN urls are often similar to https://svn.server-name.com/my-repository/trunk/my-subfolder
For more information about repositories, working copies, SVN and Git, see Use version control
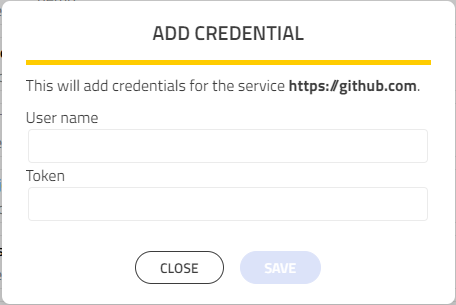
To check out/clone a version controlled project from Git or SVN, click on the "Add" button in "Edit" mode, or on "Add Project" from the Project Explorer and enter the required information. The repository URL can be any Git or SVN URL in https format (ssh is not supported). If credentials are already available in the saved credentials, this will be shown. If not, credentials need to be entered, and these are saved if the checkout is successful.
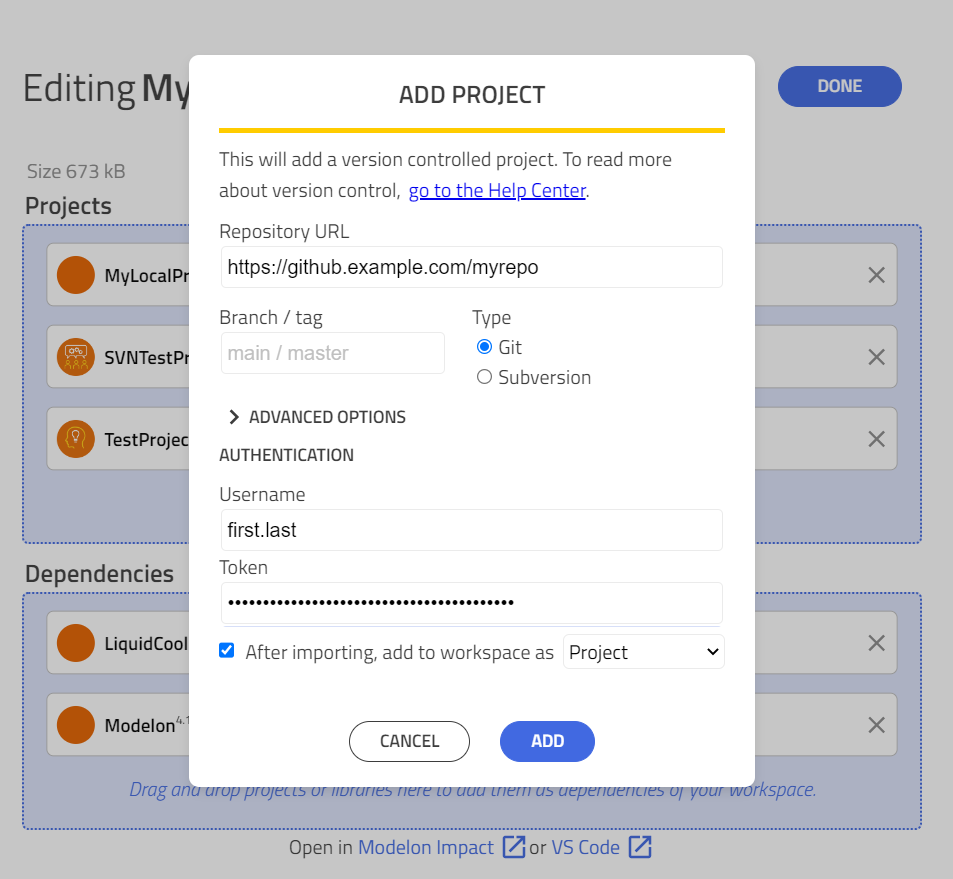
The branch/tag field (for Git only) can be used to check out a specific branch or tag. If left blank, the default branch is checked out. For SVN, the branch/tag is specified through the URL. The revision field (for SVN only) can be used to check out a specific revision of the repository. If the field is left blank, the latest revision is checked out.
When clicking 'Add', a working copy of the project repository is checked out/cloned to your user disk. This can take a while if the repository is large. A spinner is shown with the possibility to cancel the operation if desired. After the checkout has been completed, the project is available in the list of projects in "Edit" mode in the workspace configuration page, and in the list of projects on the projects page. If you checked the checkbox "After importing, add to workspace as a ...", the project will be added to the workspace when the checkout has finished.
Tip
By default, sparse checkouts are used to save disk space. If you need a full checkout of the repository, there is an option to do this in "Advanced options" in the "Add project" dialog.
Tip
For git, it is strongly recommended to work on your branch to avoid conflicts with remote changes in everyday work. Any conflicts with remote changes are then handled only when changes are merged to another branch (e.g. main/master).
Work with Version Control🔗
An icon next to the project context menu indicates the current version control status of the project. If no icon is shown, that means the project is version controlled and up to date, i.e. there are no remote updates or local modifications.
-
 A plus icon indicates that the project is not version controlled. Click the icon to connect the project to a remote repository, and be able to upload the contents. When the repo is connected to the remote URL, the status will be "modified" (up arrow), and the changes can be uploaded, see the next bullet point.
-
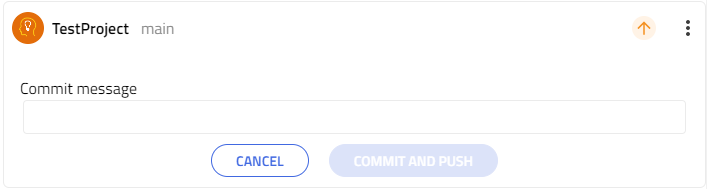
 An up arrow icon indicates that there are local modifications to the project, e.g. from editing, adding, or deleting models in any library inside this project in Modelon Impact. To inspect the changes, open the working copy in VS Code through the context menu. See hints on how to view the changes in the section Version Control in Visual Studio Code. To upload the changes so that everyone with access to the repository gets access to them, click "Commit changes" (for SVN) or "Push changes" (for Git) in the context menu. A field will appear where a commit message can be entered. The changes are committed/pushed to the current branch.
Note
Common practice is to set the commit message to a short description of the changes which are committed, and a development ticket number if relevant.
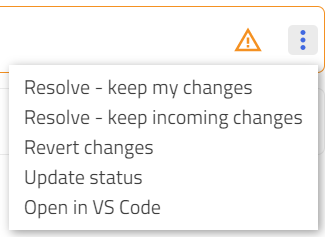
To view the changes file by file, open the working copy in VS Code through the context menu. Hints on how to view differences in Visual Studio Code are available in the section Version Control in Visual Studio Code. To revert all local modifications in the project, use the "Revert changes" option in the context menu.
-
 A down arrow indicates that remote updates exist for this project, i.e. the working copy is not up to date with the remote repository. Clicking the arrow updates the project to the latest revision.
 -
 A warning triangle icon indicates that the status can not be fetched, and more information on why is provided through the tooltip. If the warning is because there are no credentials stored for this repository, click the icon to add credentials to be able to show the status.
The warning could also be due to conflicts between local modifications (my changes) and remote updates (incoming changes) to the project. This could happen if two or more users work on the same branch and make changes in the same files. The context menu can be used to resolve the conflict using "keep my changes" or "keep incoming changes". "Keep my changes" will resolve the conflict by keeping your own full file for each file where there are conflicts with remote changes. This will result in the "modified" status, and your changes can then be uploaded to the repository if desired. "Keep incoming changes" will keep the full file from the remote repository for each file where there are conflicts.
To edit the conflicts manually, open the working copy in VS Code, open each conflicted file in the "Source control" view, select "Accept current" or "Accept incoming" for each conflict and then accept the conflicts as resolved when prompted. See more hints related to this in the section Version Control in Visual Studio Code.
There is also an option to revert all local modifications to the working copy. This will revert any changes done to models that are already version controlled, but no local files will be removed from disk.
Note
SVN tree conflicts (e.g. two users adding a model with the same name) can currently not be resolved by the "Resolve" actions in the context menu. These conflicts have to be resolved in another tool (e.g. Visual Studio Code or a terminal).
Open Workspace in Visual Studio Code🔗
The link at the bottom of the page to open the workspace in Visual Studio (VS) Code may be convenient for checking the status of all version controlled libraries inside the workspace simultaneously. Clicking the link will open a VS Code workspace which includes all projects in the current Modelon Impact workspace. Going to the "Source Control" view (icon in the left sidebar) will show the local modifications in each of the version controlled projects. See more information in the section Version Control in Visual Studio Code.
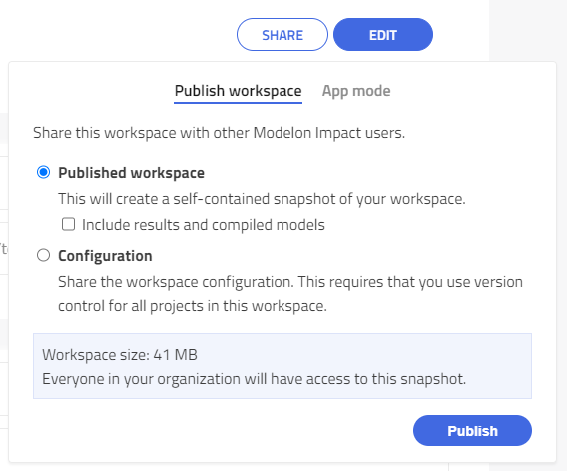
Share a Workspace🔗
By clicking the "Share" button, you can share your workspace with someone else through a link, which is convenient when you want to collaborate on a project or share your work with others. There are three types of sharing available from Workspace management app:
-
As a snapshot copy of the workspace ('Publish workspace')
-
As a snapshot copy with an additional lock on current model ('App mode')
-
As a checkouts configuration ('Configuration').
The options of publishing the full workspace or an app mode workspace are also available from the main UI of Impact, and are described here.
Sharing of a workspace configuration (option 'Configuration') is based on the projects in your workspace being under version control.
When the link is pasted in an email/chat/etc., it will be formatted as "Impact workspace: MyWorkspace".
Note
All projects in your workspace have to be under version control for you to be able to share the workspace in configuration mode. If any project in the workspace is not under version control, you will get a notification when clicking the Publish.
Warning
With configuration sharing, if any of your version controlled projects contain local modifications, the receiver will not get the same contents as you shared. If you have local modifications, you will get a warning when clicking the Publish button.
The receiver that clicks the link will be guided through checkout of all version-controlled projects, and when all projects are available, the workspace can be imported by clicking "Import workspace", and the workspace is opened in Modelon Impact. If you already have checkouts matching the projects in the shared workspace, these are used, and if you have more than one match you can select which one to use.
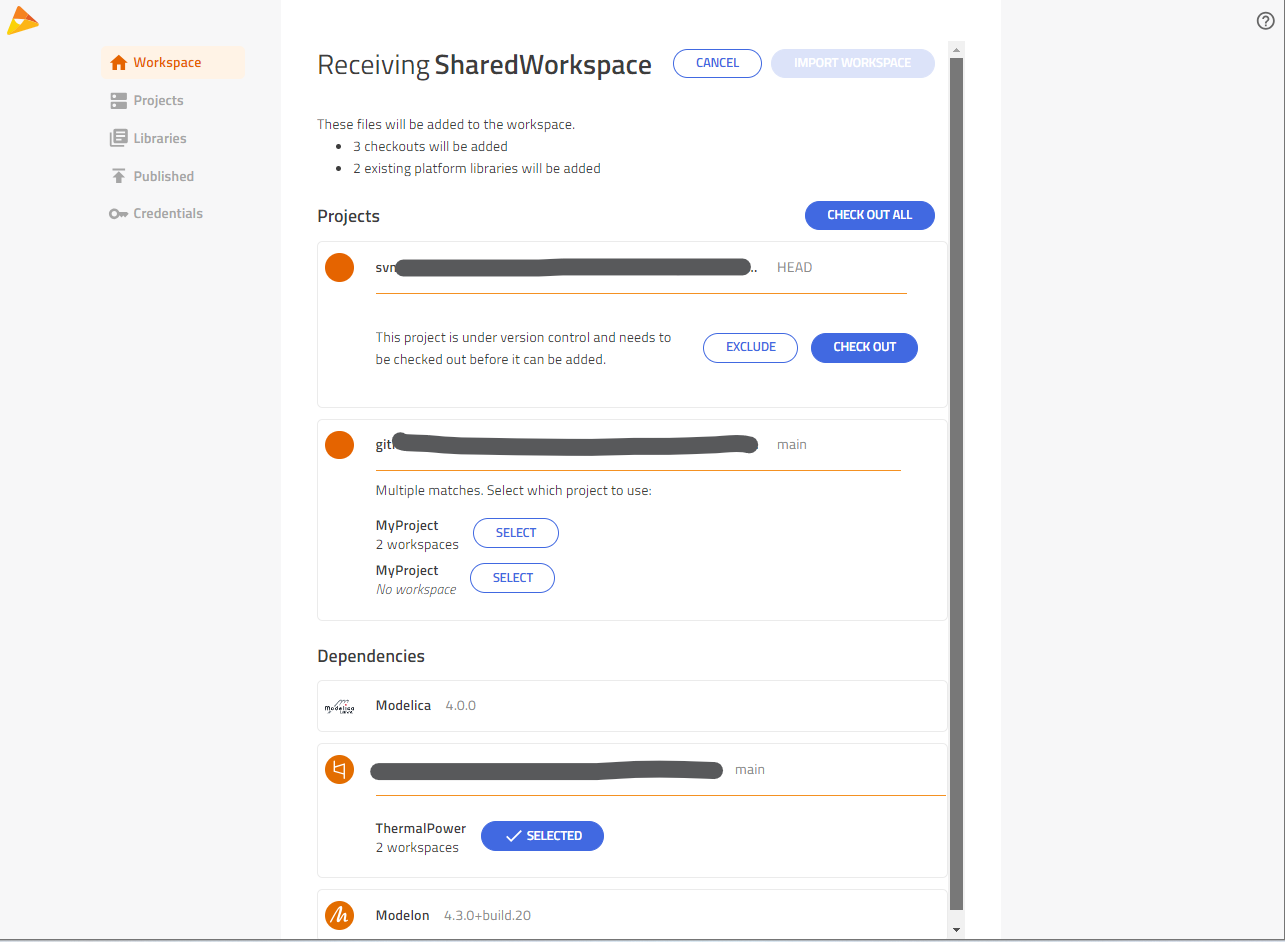
If your collaborator has pushed updates to a version controlled project in the shared workspace, you can fetch these through the down arrow.
An example of a shared workspace to try out is Impact workspace: ExcelDemo, which uses an open source project and Modelon Impact Libraries.
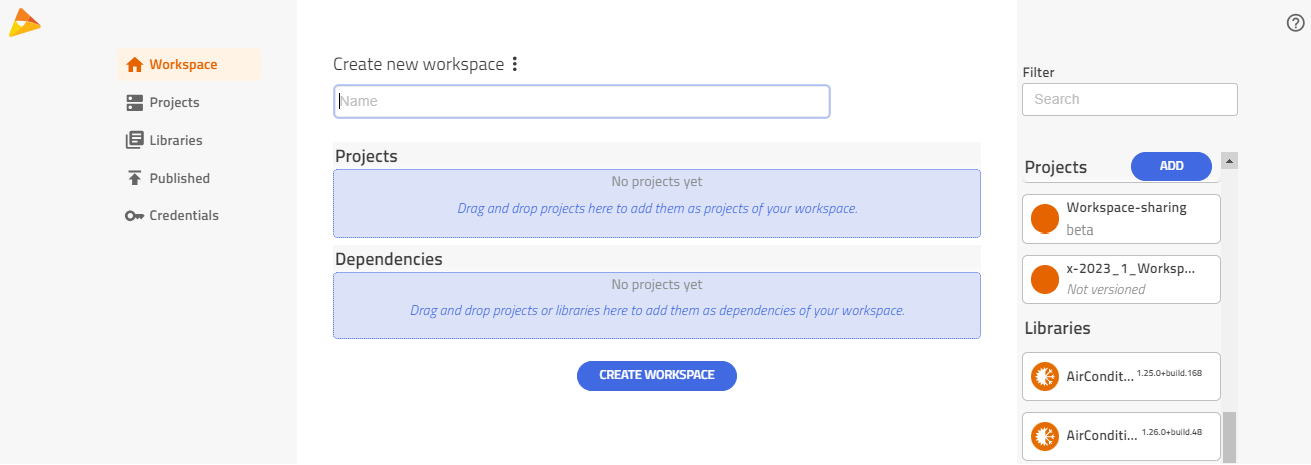
Create New Workspace🔗
When the workspace configuration page is opened from the Modelon Impact landing page, a page for creating and configuring the workspace is shown. Specify a name of the new workspace and drag and drop projects from the panel to the right to "Projects" and/or "Dependencies", see Configure Workspace.
After clicking "Create workspace", the workspace is created and the page switches to configure mode, where you can continue configuring the workspace or opening it in Modelon Impact or VS Code.
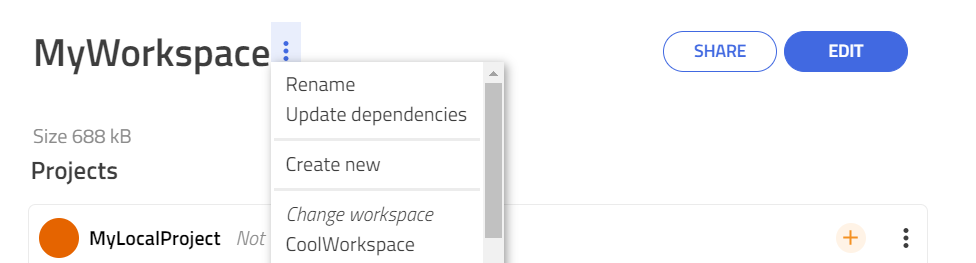
This view can also be accessed from the context menu at the workspace name, where you can also switch to configure another workspace.