Version Control🔗
Introduction🔗
Version control is a method of managing and tracking changes to text/code. Since Modelica models are graphical representations of Modelica code, version control can be used to manage and track changes made to them in Modelon Impact workspaces.
Version control in Modelon Impact can be done in two ways:
- adding version control to the entire workspace (possibly including experiment setups, settings, etc)
- using version control for single libraries used in Modelon Impact.
Option 2 is more convenient if the libraries are already under version control. Setting up the entire workspace to be version controlled is handled in the tutorial version Control of a Workspace.
Modelon Impact Workspace Management simplifies using version controlled libraries with Modelon Impact on JupyterHub. Through this app, a user can get existing version controlled content, set it up for use in Modelon Impact workspaces, and share changes with others through basic version control operations. See more information in the Workspace Management documentation.
For Windows desktop users, the use of version-controlled libraries needs to be handled manually, through the instructions in Version Control of Libraries with Modelon Impact Desktop.
Version control basics🔗
Modelica models are stored in source code (.mo) files, which can be managed, tracked and shared using version control systems such as:
-
A typical setup for version control systems is to have a master repository stored on a server, which all users can access. In Modelon Impact, workspaces are containers for models and associated artifacts (external data, compiled objects, settings, results etc.), and the *master repository can conveniently be defined as the top-level directory of a workspace that needs to be shared with multiple users.
-
A working copy/clone of the master repository from the server will be checked out (cloned) by each collaborating user onto their local disk. For any user that clones or checks out this master workspace repository, all artifacts including models and their graphical appearance, parameterization and simulation results will be identical, since a working copy will also contain all files of the workspace repository.

Tip
Version control systems typically provide a method to "ignore" or "exclude" certain files so that they are not versioned. This could be a useful way to avoid versioning of binaries like compiled models (FMUs) or compiled external code. More on this is below.
-
Updates done by other users can be fetched to the working copy through the update (pull).
-
Editing of a model will update the users' working copy and commits (pushes) are used to share the changes to models or sets of models from the working copy to the master repository. Committing or pushing changes to the master repository will create a new revision number. Other users can then check out the revision/version of the master repository that reflects the committed changes, or update (pull) their working copy.
If the libraries to be developed or used in Modelon Impact are already under version control (the master repository already exists contains the libraries to be used), they can conveniently be configured for use in Modelon Impact through Modelon Impact Workspace Management available for Modelon Impact on JupyterHub. For Modelon Impact Desktop users, this can be done manually using the instructions in section Version Control of Libraries with Modelon Impact Desktop. The overall workflow with checkout (clone), update (pull), commit (push), is the same as above.
Warning
If a model is edited by more than one user at the same time, conflicts may arise during commits (pushes) to the master repository. Fortunately, these can be resolved easily.
Tip
The best practice is to communicate and plan the work within the teams to avoid working simultaneously on the same model.
Info
The version control workflow mentioned here is relevant to Modelon Impact Desktop and Modelon Impact on JupyterHub. For on-premise or on-premise versions of Modelon Impact, workspaces reside on a common storage and all authenticated users can access the workspaces. For more information on version control for Modelon Impact on-premise/On-Premise installations, please contact support@modelon.com.
Azure Devops
Azure devops is an end-to-end software development platform that as a part of the solution provides version control. Modelon Impact supports Azure DevOps integration through version control capabilities with Git in the Workspace Management app.
Version Control of Libraries🔗
If the libraries to be developed or used in Modelon Impact are already under version control, it may not be convenient to version control the entire workspace. For this case, working copies can be linked to the Impact workspace using symbolic links, or checked out inside the workspace. For Modelon Impact on JupyterHub, this is conveniently done using Modelon Impact Workspace Management. For Modelon Impact Desktop users, this can be done manually using the instructions in the section Version Control of Libraries with Modelon Impact Desktop.
Modelon Impact Workspace Management enables users to both check out/clone content from SVN/Git, use libraries from these working copies in Modelon Impact workspaces, share their changes with others, and fetch updates are done by other users. It also gives an overview of all version controlled content, and the content used in a workspace, as well as the status of each working copy (see if there are updates to fetch, see if there are local modifications, ...). Workspace Management is accessed from the "Apps" menu in Modelon Impact (landing page or inside a workspace), and is described in detail in the section Workspace Management.

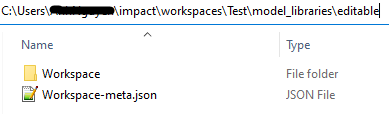
To work with libraries which are already version controlled in Modelon Impact Desktop, symbolic links can be used, or the libraries can be checked out/cloned directly in the workspace. The folder to link or clone content to is \Impact\workspaces\<workspace_name>\model_libraries\version_controlled\. The requirement is that all directories in the \version_controlled\ folder adhere to the rules of a structured Modelica library, including containing a package.mo file, or a non-structured Modelica library (single .mo file).
Below is an example of using symbolic links to bring libraries that already exist somewhere on disk into the Impact workspace.
For example, libraries are checked-out\cloned to C:\Projects\SVN\
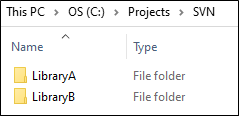
The goal is to link LibraryA into a workspace named Test at C:\<user>\Impact\workspaces\Test\model_libraries\editable\.
Setup the symbolic link in a Command Prompt with the following input:
mklink /D <Link path> <Target path>

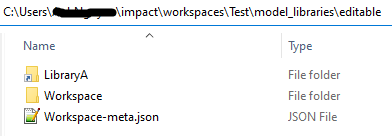
The symbolic link will then be created at the <Target path>.
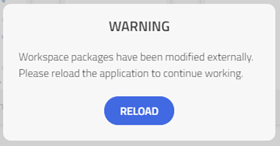
After the library has been added to the workspace, if Modelon Impact is running and the workspace is already open, the following warning will appear.
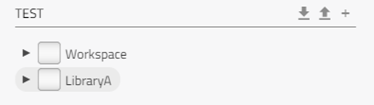
After reloading, the linked library will then appear in the workspace.

Tutorial: Version Control of a Workspace🔗
Version controlling an entire Modelon Impact workspace is convenient if the libraries in the workspace are not under version control already. A version-controlled workspace makes it convenient to share both models and associated artifacts (external data, settings etc.) with other users. This tutorial shows how to set up a Modelon Impact workspace to be version controlled in SVN (a) or Git (b or c) on Windows (applicable for Modelon Impact Desktop).
-
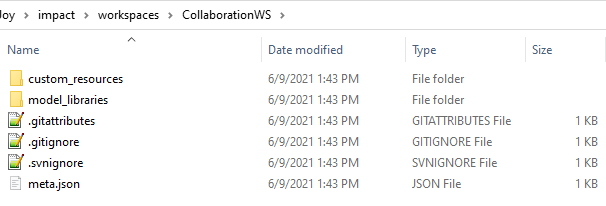
Create a workspace named CollaborationWS. Modelon Impact will initialize the workspace with some needed files and folders.
-
Copy an example model, e.g. Modelica.Blocks.Examples.PID_Controller, from the Modelica library to the workspace.
This workspace model will be used in this tutorial to do version control with:
(1) TortoiseSVN (2) GitHub (3) GitBash
SVN using TortoiseSVN🔗
Prerequisites🔗
-
A prerequisite for version control of a Modelon Impact workspace using Subversion (SVN) is access to an SVN repository to which the workspace is uploaded.
-
For interacting with SVN, there are many tools available. In this tutorial, TortoiseSVN, a Subversion client for Windows, is used. To do the tutorial, make sure TortoiseSVN is installed, with command line tools.
-
In addition, this tutorial assumes that a workspace named CollaborationWS has already been created in Modelon Impact.
Set up and configure a working copy🔗
Follow the steps below to apply version control to the previously created workspace CollaborationWS using SVN.
-
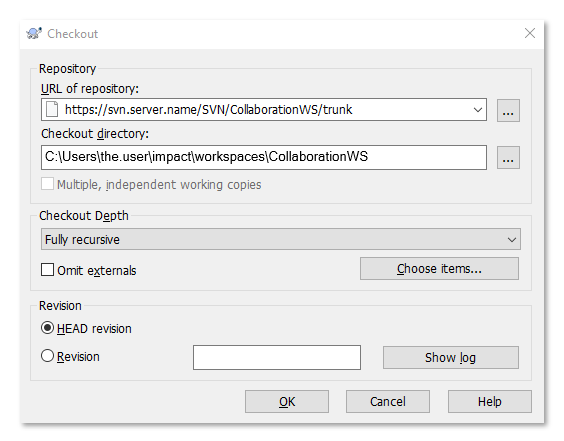
Go to
C:\Users\<user_name>\impact\workspaces\<workspace_name>folder, right-click and select SVN Checkout (you should have this option in the menu if TortoiseSVN has been installed). -
Edit the URL of repository to specify the workspace path in the repository, and edit Checkout directory to specify the local path to the workspace. Then select OK.
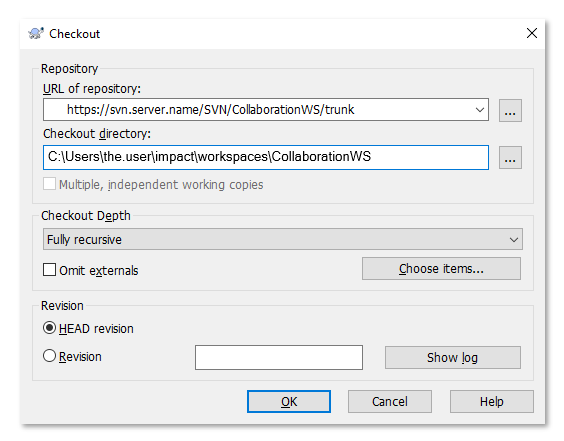
Note
The head/latest or a particular revision of the specified repository can be checked out using TortoiseSVN.
Tip
The specified URL must exist on the SVN server, before it can be checked out.
-
This will bring up a prompt saying Target folder is not empty; select Checkout to proceed.
-
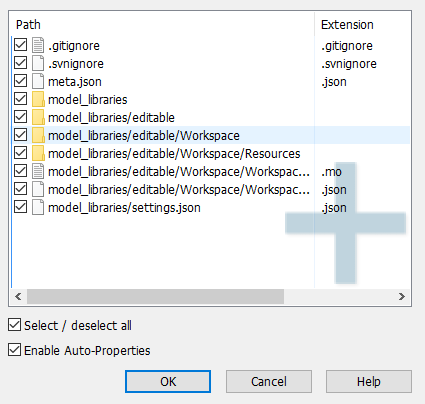
In order to exclude items in the workspace from version control, Modelon Impact generates a default
.svnignorefile. The contents of the default ignore file are shown below.
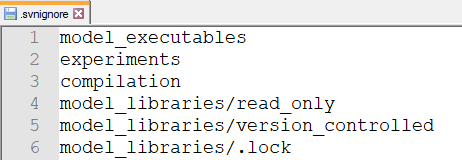
- Apply the default SVN ignored properties (this prevents binaries generated by the tool to be version controlled by default).
In the command prompt, run the following commands:
cd C:\Users\<user_name>\impact\workspaces\<workspace_name>

svn propset svn:ignore -RF .svnignore.
Warning
If svn is not recognized as a command, make sure that the command-line client tools feature was installed with TortoiseSVN.
Tip
Applying the ignore property as mentioned above will exclude all the contents specified in the .svnignore file from version control. This may have consequences for other users that check out this workspace from the master repository. For example, the exclusion of model_executables from version control would mean that FMUs are not stored in the repository and that models have to be recompiled, and exclusion of experiments would mean that no result files from any previous simulations would be available.
- Add and commit the files to the repository. Right-clicking on the workspace folder and selecting SVN Commit... or TortoiseSVN -> Add... should bring up a screen similar to the one below.
- To check out an existing (non-empty) workspace from a remote SVN repository, right-click on the workspaces folder
C:\Users\<user_name>\impact\workspaces\and select SVN Checkout.
Tip
TortoiseSVN will append the name of the repo from the URL to the Checkout directory by default. Make sure that this is the correct name for the workspace.
Editing and sharing models🔗
When a model is edited, the changes have to be committed to the remote SVN server so that other users can access it.
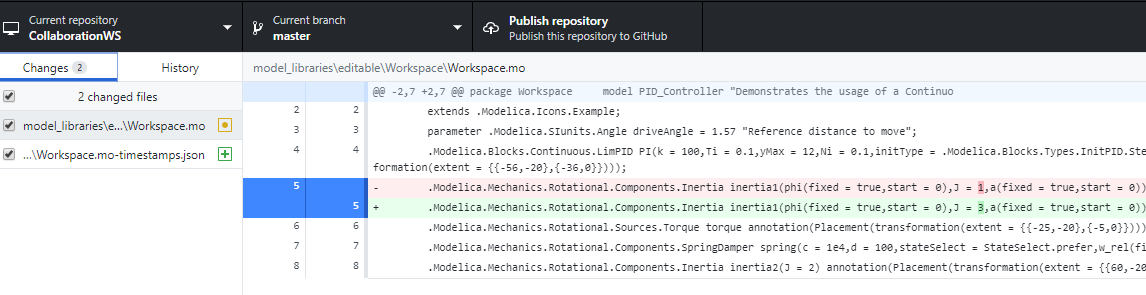
- Open the model that we copied to the workspace and change the parameter value of any of the components in the model. In our model, change the parameter inertia1.J = 3.
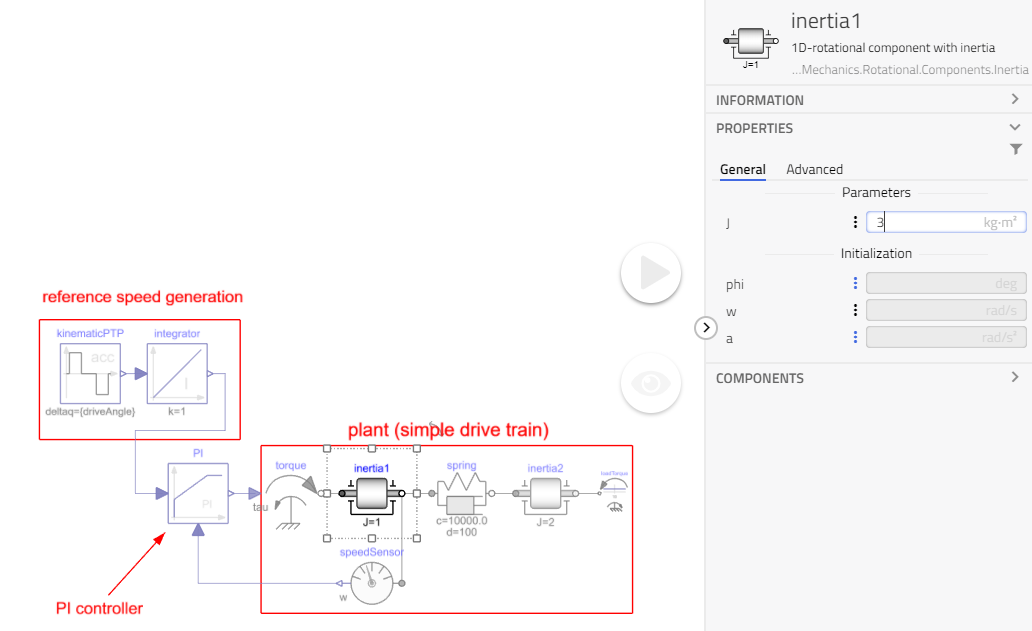
Tip
Refer to the edit model parameters chapter for help. Changes are saved immediately to the disk.
-
Right-click on the CollaborationWS folder from File Explorer and select SVN Commit. A dialog will list the changed files.
-
Compare the changes to the base model by right-clicking and choosing Compare with base option. The difference will be shown in TortoiseMerge.
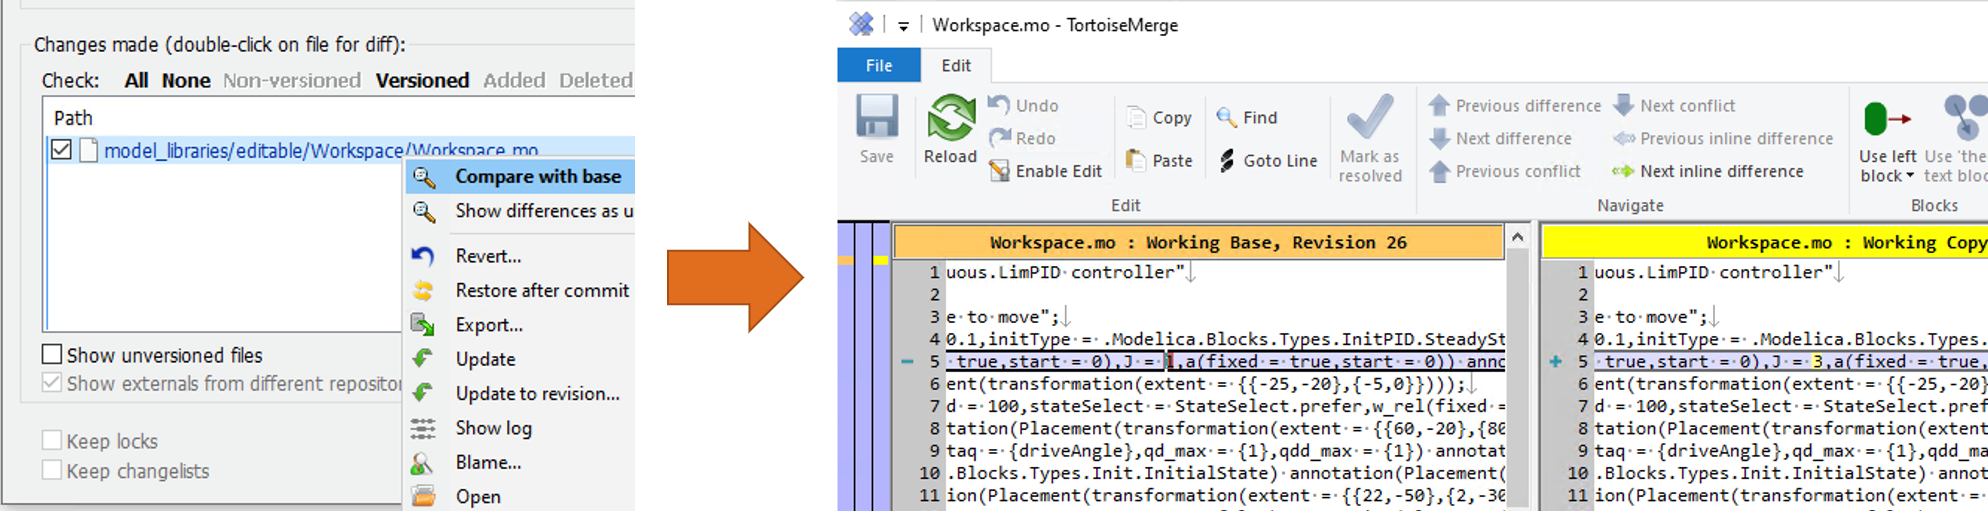
- Close the dialog and click OK to commit the files.
The updated version of the workspace, including the parameter changes, can now be checked out from the master repository by all the users.
Retrieve changes done by other users🔗
If someone else has made changes to the workspace, we can get those updates through the following steps.
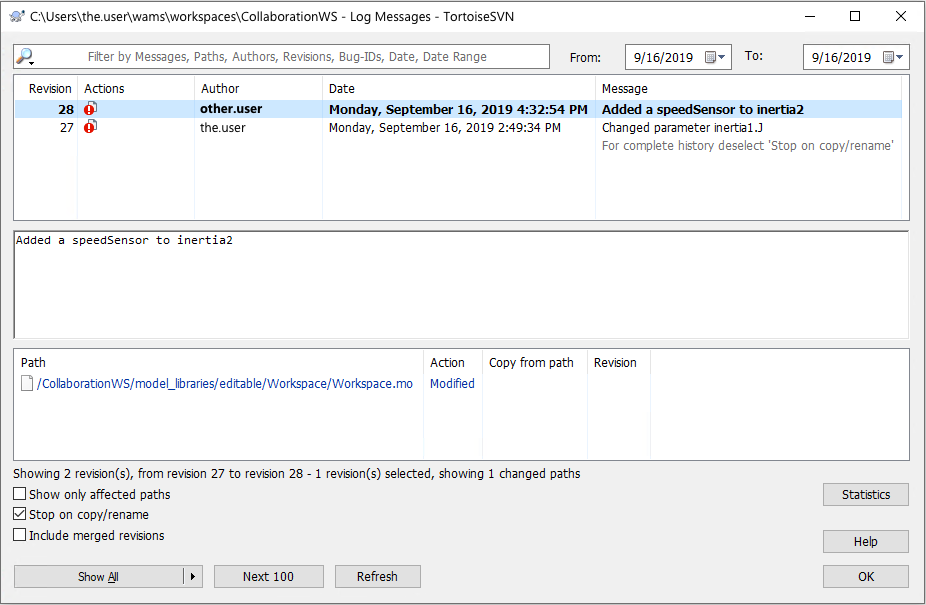
Let's assume that another user had added a speed sensor to the model and then pushed the changes to the SVN remote server (master repository).
- Right-click on the CollaborationWS folder and select SVN Update.

Your local copy will be updated to the latest revision from the SVN remote server, which includes the changes from other users.
- Click on Show log to inspect the changes made to the file. A list of all the updates will be shown in the Show log dialog along with a commit message from other users.
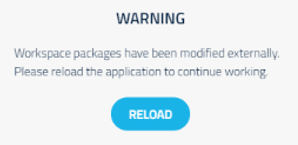
- If the model is opened in Model Impact, a WARNING dialog will let you know that the workspace has been modified externally. Select RELOAD to get the updated changes in the model.
Git using GitHub Desktop🔗
Prerequisites🔗
Git is another common version control tool intended for collaborative development. It is used here to demonstrate a common workflow for collaborative model development.
Prerequisites for this tutorial are:
- Access to a shared repository on GitHub.
- Installation of the open-source tool GitHub Desktop.
- Access to an empty Git remote repository.
In addition, this tutorial assumes that a workspace named CollaborationWS has already been created in Modelon Impact.
Create and configure a repository for a workspace🔗
- Open GitHub Desktop and log in using GitHub or GitLab account. Create a new account if you haven't signed up already.
- A list of all available repositories on GitHub will be listed to the left of the GitHub Desktop window.
- Click + Create a New Repository from your hard drive… and you will be asked to fill in the Create a new repository dialog.
For this tutorial, enter the following data:
-
Name: CollaborationWS
-
Description: Demo workspace repository
-
Local path:
C:/users/<user_name>/impact/workspaces(note that this should not include the repository name)
Select Create repository. Your local repository will be created.

The toolbar includes the current repository name and what branch we are working on (master is the default branch). Indicators in the tool UI also tell us whether the repository is published to the GitHub remote server and whether local changes have been made.
History tab in GitHub Desktop includes a list of commits done to this repository. The below image shows an initial commit that has been done automatically by GitHub Desktop, which has added the entire content of the workspace to the local repository as a starting point.
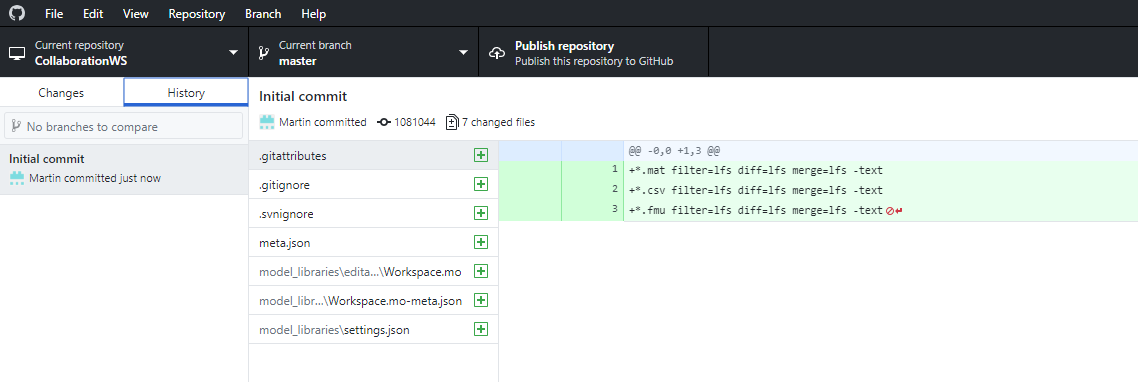
You can browse the list entries to see the modifications made to the files (in this case only added files).
Tip
Once the user starts to work and commits their changes, they will appear in the list above in reverse chronological order.
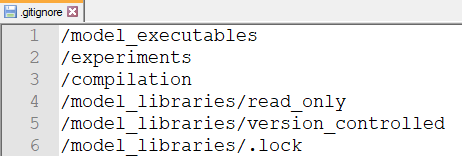
Only models and their associated data (views, favorites) are shared by default. Large binary files, including FMUs and result files,
are excluded from version control, in order not to consume a large amount of disk space. In order to exclude these items in the workspace from version control, Modelon Impact generates a default .gitignore file. The contents of the default ignore file are shown below.
To efficiently store large files like model executables and the result files, the Git add-on LFS (Large File Storage) is supported. Git LFS enables version-controlled storage of binary artifacts at appropriate data storages, which are separated from the source code repository.
Warning
It is not easy to remove binary files once they have been added to Git LFS.
Version control of binary artifacts in Impact workspaces can be configured as follows:
- Open the repository folder by selecting Show in Explorer or CtrlShiftF from the keyboard.
- Open
.gitignorein Notepad and comment out or remove the first three lines referencing workspace directories containing model executables, experiment data and HTML diagnostics files respectively.
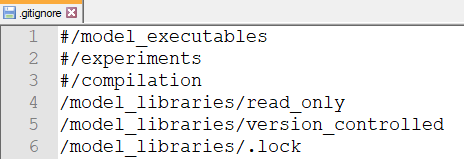
These files will instead be uploaded to the LFS as defined in .gitattributes file in the workspace directory.

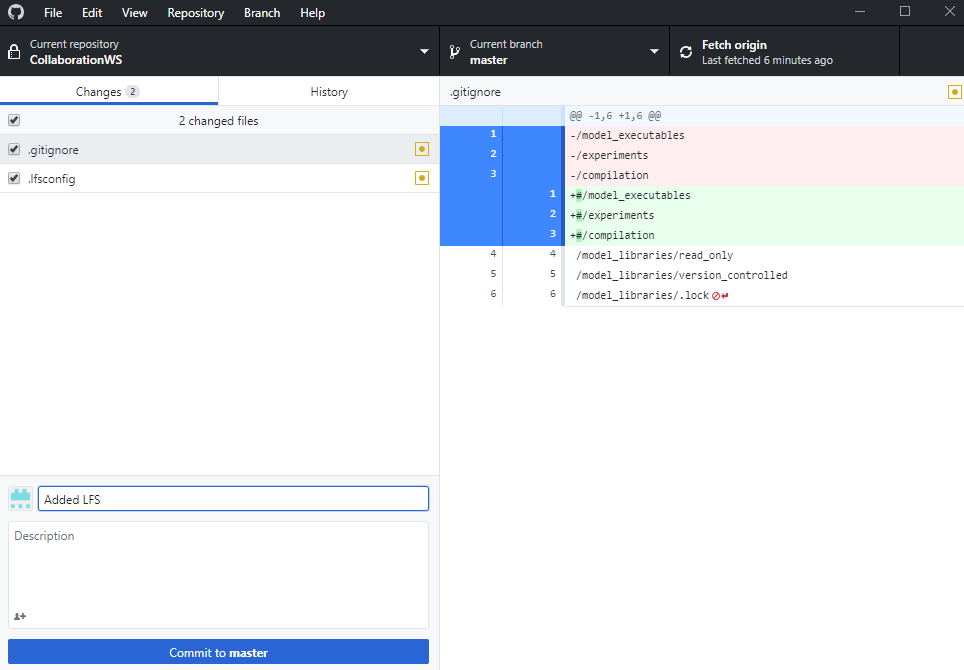
- Add a file
.lfsconfigto the repository. It should contain the address to the LFS server
Tip
Get the needed details from the LFS provider that you are using.
An example of the .lfsconfig file:
[lfs]
URL = "https://the_user:AF4gFbueGf43f@artifactory.company.com/lfs-local"
- In GitHub Desktop, add an appropriate commit summary and select Commit to master.
Pushing a repository to the remote GitHub server enables other users to clone your repository and commit their changes.
- Click Publish Repository in the toolbar and enter all details.
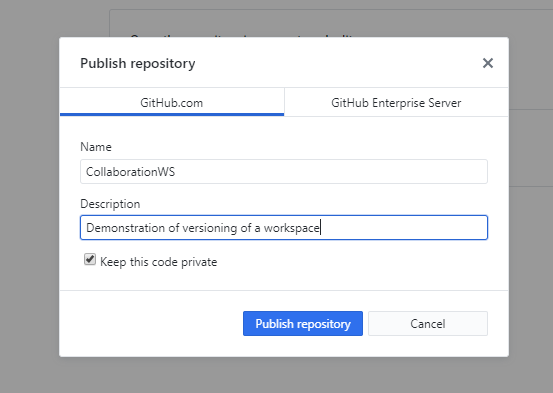
- Select Publish repository to upload it to GitHub.
Once it is finished, go to https://github.com/<user_name>/CollaborationWS to see files appearing on the GitHub server. Note that CollaborationWS is the name of the repository in this case.
Set up a working copy for the workspace🔗
An existing repository can be cloned and used for collaboration via the following steps.
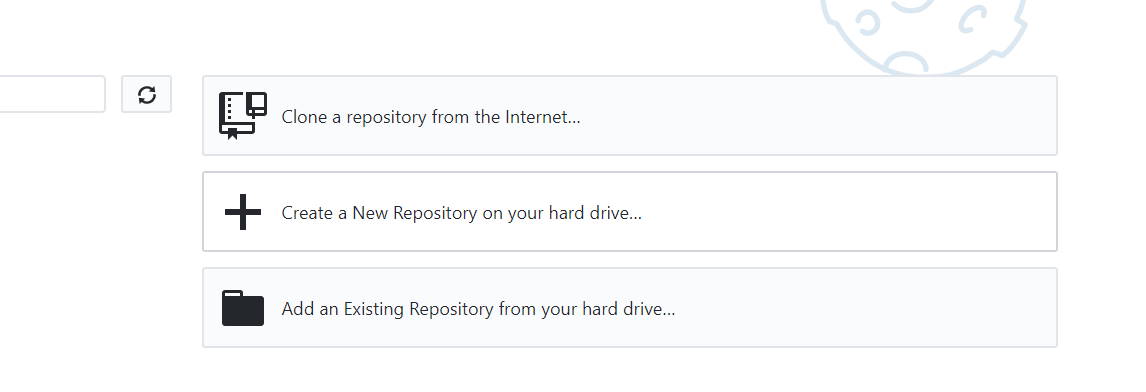
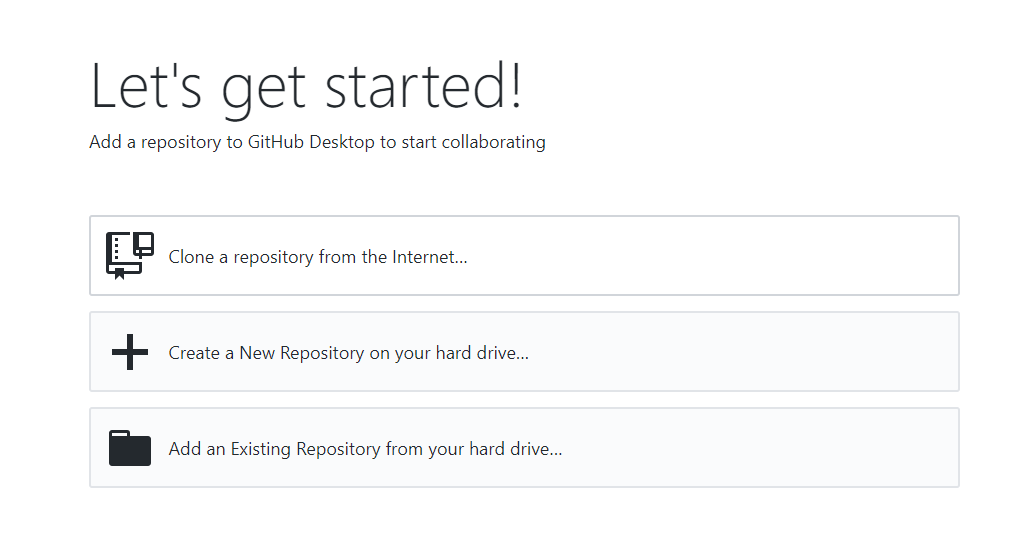
- Select Clone a repository from the Internet from the GitHub Desktop landing page.
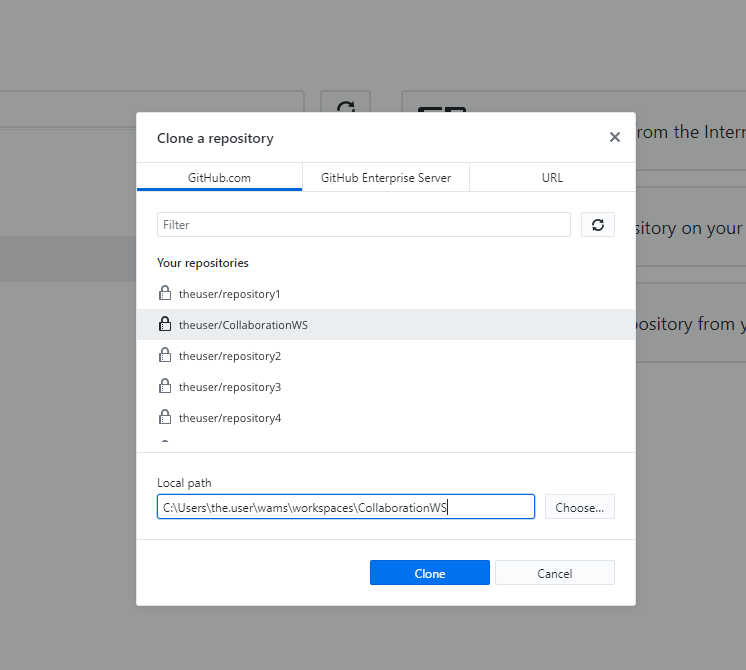
- Sign in and select from the list of available repositories. Make sure to check them into the workspace folder,
typically located on:
`C:/Users/<user_name>/impact/workspaces/<repository_name>`
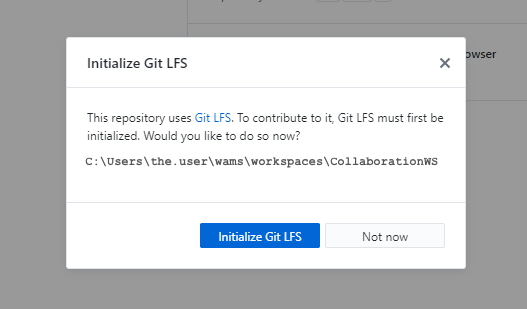
- If a repository is configured to be used with LFS, GitHub Desktop will query if it should initialize Git LFS. Choose what is appropriate for your local repository.
The local repository is now ready to be used for collaboration.
Editing and sharing models🔗
When a model is edited, the changes have to be committed to the remote GitHub server so that other users can access it.
-
Open the model you copied to your workspace in Modelon Impact.
-
Change a parameter value in the inertia component. In our example, set inertia1.J = 3.
The changes are immediately saved to disk.
- In GitHub Desktop, a list of changed files is displayed in the left-side toolbar of the application. Inspecting the diff, you can view details of the changes you made.
-
Enter a Commit Summary and then select Commit to Master. This command will commit the change to the user’s local working copy of the workspace.
-
Select Push Origin to push the changes to the remote server.

Once done, other users can access the updated version of the workspace, including the changed model.
Retrieve changes done by other users🔗
If someone else has made changes to the workspace, we can get those updates through the following steps.
Assume that another user had added a speed sensor to the model we copied to the workspace and then pushed the changes to the GitHub remote server.
We can get these changes by doing the following steps.
- Choose Fetch origin in the toolbar, to fetch the new revisions of the code from the remote server.
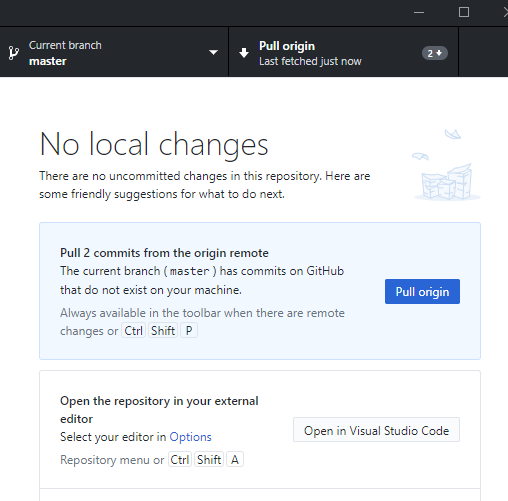
We can see the result after a fetch where new data was present on the remote server.
-
Select Pull origin to get those changes and update them to the local workspace.
-
Switching back to Modelon Impact, we are greeted by a dialog telling us that the workspace has been modified externally and needs to be reloaded. Click RELOAD to have a look at the changes.
Tip
GitHub Desktop will also ask you to fetch in case there are newer revisions of the code on the server, to ensure that you solve and merge any conflicts before pushing your changes to the remote server.
Git using Git Bash🔗
Prerequisites🔗
Prerequisites to version control Modelon Impact workspace using Git Bash are:
-
An installation of Git that can be used through a Bash terminal.
-
An empty Git remote repository - to which the user can upload the workspace.
Create repository🔗
It is possible to create a local Git repository and link it to a remote server using the command line.
Create or find a workspace in Modelon Impact, that you wish to version control using Git Bash.
-
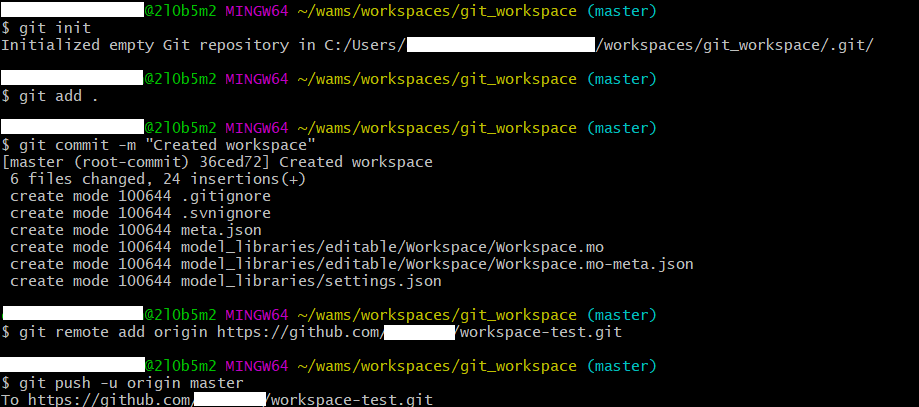
Open Git Bash and navigate to the workspace:
cd C:\Users\<user_name>\impact\workspaces\<workspace_name> -
Create a Git repository of the workspace:
git init -
Add all the workspace files to Git
git add -
Make an initial commit:
git commit -m “Created workspace” -
Add your remote (for example from GitHub) to your local repository:
git remote add <remote_name> <remote_url>
Observe that remote_name will be the name for the remote and any name can be used (origin is typically used). The service you are using for hosting the remote repository will have instructions about what remote_url should be.
- Now push the local changes to the remote:
git push -u <remote_name> master
Editing and sharing models🔗
Editing and sharing models are done similarly as described in Version Control in Git using GitHub Desktop, but instead using git add, git commit, and git push commands in Git Bash.
Retrieve changes done by other users🔗
Retrieving changes done by other users are done similarly as described in Version Control in Git using GitHub Desktop, but instead using git fetch and git pull commands in Git Bash.