Modelica Wrapper Tutorial🔗
| Support: | Only Cloud |
|---|---|
| Version: | Release 2022.2 (v1.8.x) |
| Version: | Release 2023.1 (v1.10.x) |
| Level: | Advanced |
Purpose🔗
-
This tutorial will go through the steps needed to create a Modelica wrapper around C/C++ code.
-
After going through this tutorial, you will be able to wrap a shared object in Modelica and use them in system simulations.
Related articles🔗
- Shared libraries
Outline🔗
-
The Modelica Wrapper tutorial is divided into 2 stages:
-
Stage 1: compile C/C++ code into a shared library (.SO).
-
Stage 2: create the wrapper for the shared object in Modelica using an existing template.
-
Skip to stage 2, Shared Object Wrapper Function, if you have a .SO file (with function names and inputs), .
Background🔗
-
Shared objects are compiled external libraries for Linux OS and DLLs are compiled external libraries for Windows OS.
-
Some manufacturers/software vendors provide models of their industrial equipment in the form of a .SO/.DLL file to protect the intellectual property of their components.
-
This means some additional steps are needed to integrate it with physics-based solvers.
Requirements for tutorial🔗
-
WrappedModel.zip package
-
Access to Impact 1.10.2 (cloud native)
-
C/C++ code or a shared object (.SO) with provided function names and inputs.
Introduction🔗
An example file, MyCCode.c is included, containing a function named ‘myfunction’.
Description of myfunction
-
myfunction takes in 2 inputs which are both type double and returns one output, also of type double.
-
the Modelica language explicitly allows integer, boolean, string , and enumeration (link).
-
simple types, arrays are supported for both C and Fortran code, and records are supported as struct(s) in C code.
-
The tutorial builds C code into a shared object and not DLL because Impact cloud uses Linux as the foundation OS, CentOS 7 being the specific distribution that is used in Impact.
-
If the shared object contains external library dependencies that are not available with Modelon Impact installation, the shared objects might not work.
Breakdown of myfunction
-
Macros DLL_PUBLIC and DLL_LOCAL are defined from lines 4 to 27 in MyCCode.c.
-
These allow the same C code to be compiled with different compilers, on different platforms, and for different purposes.
-
For example, the dllexport storage class attribute is used to indicate that the function should be available for export from the shared library.
-
This is selected with the BUILDING_DLL macro that can be set from the call to the compiler.
-
On Linux, the DLL_LOCAL macro is used to flag private functions in the shared library’s interface with later versions of gcc. This can be applied to local functions that do not need to be exposed by the shared library.
-
In lines 31 to 34, the extern “C” block is used to prevent name-mangling from the C++ compiler. This is necessary to enable the function to be called from standard C89 code (as defined by the Modelica specification).
Stage 1 Build a Shared Object🔗
The steps involved in compiling C/C++ code into a shared object are as follows:
-
Login to Impact, open JupyterLab (from Apps) and open terminal.
-
We have provided a compiler (GCC) with Impact, so no additional environmental setup is needed.
-
Browse to impact/workspaces/
/model_libraries/editable/WrappedModel/Resources/Library and upload MyCCode.c using the upload button.
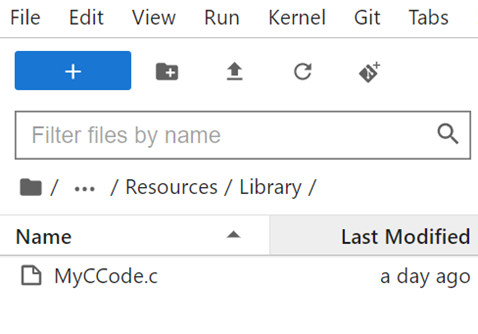
Figure 1. Uploading MyCCode.c in your workspace using Jupyterlab
-
To change the current directory type the following commands in terminal:
cd impact/workspaces/<workspace-name>/model_libraries/editable/WrappedModel/Resources/Library -
To generate a shared library after compiling the C code with the -fPIC (position independent code) flag type the following commands in terminal:
gcc -shared -o libMyCCode.so -fPIC MyCCode.c
Reload the workspace to find libMyCCode.so in the Resources/library package.
Stage 2 Shared Object Wrapper Function🔗
-
Once an object has been shared, either through building C/C++ code as shown above or generated through a software/provided by a manufacturer, the next step is to create a wrapper for this shared object in Modelica.
-
Key before continuing forward is to list the names of the functions the .SO file contains and what inputs (number/types) it takes from the user. An example of wrapper is provided for this tutorial in the WrappedModel.zip file.
-
The WrappedModel.zip file is provided as a template. In the following steps we will walk through how to edit model files in this package to customize it for specific functions.
- Import the WrappedModel.zip package into Impact cloud. The WrappedModel package looks like the screenshot below:
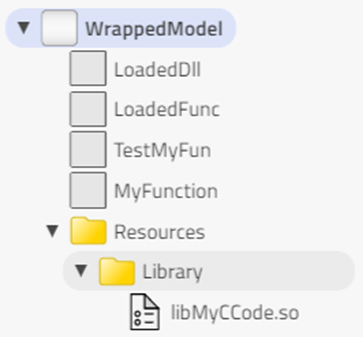
Figure 2. Structure of the WrappedModel package
-
LoadedDll: This class loads the external DLL/SO file into memory for access in Modelica. (This class should not need to be modified)
-
LoadedFunc: This class loads a specific function from the external DLL/SO for use in Modelica. (This class should not need to be modified)
-
MyFunction: This is the Modelica function that wraps the function, loaded from the DLL/SO by the previous two objects, in an external ‘C’ function for use in Modelica.
MyFunction must be modified based on your custom function.
-
If a function has 3 inputs of type Real, then one more input (type Real) must be added after lines 3, 4.
-
Call it ‘input Real c’. This change must be included in line 7 inside the brackets as well.
-
In the annotations, C code has been provided to return the output of the function ‘call’.
-
Corresponding to our initial additional input, make changes to lines 9, 11 and 18.
-
In line 9, add an additional input type ‘double’ inside the bracket.
-
In lines 11 and 18, add ‘double c’ inside the brackets.
-
Once these changes are made, proceed to the next step to test this function.
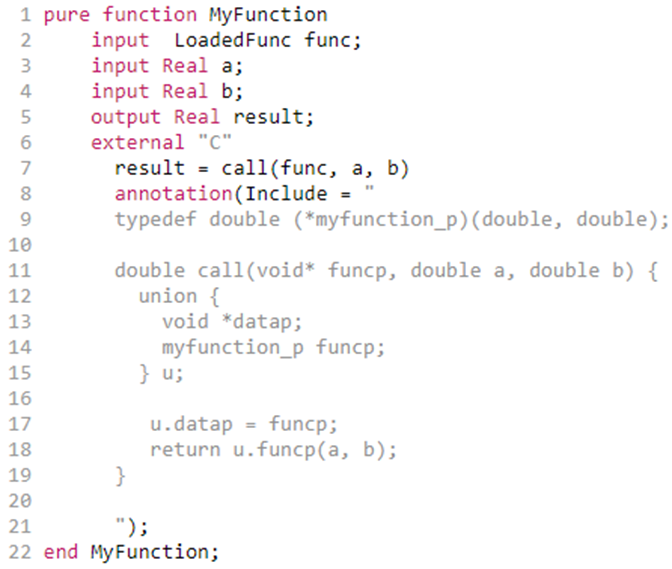
Figure 3. MyFunction code
-
TestMyFun: This model is created to test whether the functions are wrapped properly, and the output is as expected.
-
Verify that the .SO is uploaded into Resources folder using JupyterLab upload button.
-
Go to /home/jovyan/impact/workspaces/
/model_libraries/editable/WrappedModel/Resources /Library and add .SO file. -
It might not show up in the UI. Go back and refresh the workspace. It will show up in the Resources/Library package.
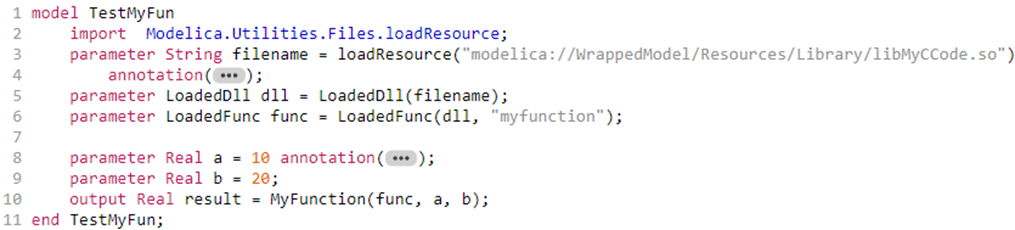
Figure 4. TestMyFun code
We will edit TestMyFun model based on the .SO file, function name and input types to test whether the functions are wrapped properly in Modelica. Also edit line 3 with the appropriate .SO filename inside the bracket. In line 6, we replace “myfunction” with the name of the function which was present in the C code/.SO file. For testing purposes, we define input parameters in lines 8, 9, …and then modify line 10 by adding those input parameters inside the bracket.
Test the External Shared Object🔗
Simulate TestMyFun and plot the result from the Calculated values using the stickies.
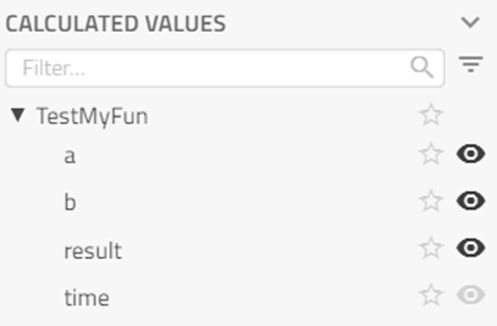
Figure 5. Calculated values in results
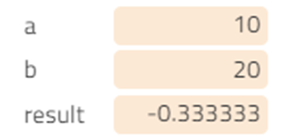
Figure 6. Stickies for calculated values
- MyCCode.c contains ‘myfunction’ function which is defined below:

Figure 7. myfunction defined in C
-
Output from ‘myfunction’ can be manually calculated.
-
Use the values of ‘a’ and ‘b’ (above) to verify the ‘result’ value .