Command Line Import via Jupyterlab🔗
Impact GUI has a limitation on uploading workspace/library/package which is greater than 100 MB.
On many occasions, the size of the library or workspace or package is more than 100 MB. Attempting to upload such files through Modelon Impact GUI results in an error dialog to appear.
For file size more than 100 MB, use only Jupyterlab to import the workspace/library/package.
How to import via Jupyterlab🔗
Compress the workspace/library/package into a .zip file. The zip archive must have the same name as the workspace/library/package. Make sure the zip file for library/workspace/package is as per the respective Impact directory structure.
Import a workspace🔗
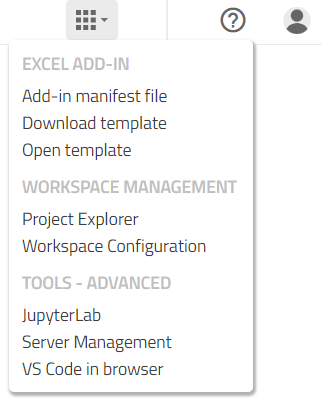
- Open Jupyterlab from Modelon Impact through the Apps menu (as shown) in the upper right corner of the browser window. Jupyterlab opens in a new browser tab. The JupyterLab interface consists of a main work area containing tabs of documents and activities, a collapsible left sidebar, and a menu bar.
-
The left sidebar in Jupyterlab contains a file browser. Upload the Zip (compressed workspace) file in the file browser of jupyterlab window by dragging and dropping files, or by clicking the
 “Upload Files” button at the top of the file browser. For more information, see the JupyterLab documentation.
 -
The zip file will be uploaded to the current workspace.
-
To open a new terminal, click the + button in the file browser or press (ctrl+shift+L) and select Terminal in the new Launcher tab
-
Unzip the uploaded zip file using the following command in jupyterlab terminal.
unzip <workspace_name> -
Move the unzipped workspace folder into the corresponding destination folder using the following command in jupyterlab terminal.
mv <workspace_name> <destination_folder>Eg:- for uploading workspace, destination location is /home/jovyan/impact/workspaces
mv <workspace_name> /home/jovyan/impact/workspaces -
Navigate to the main Modelon Impact window opened in another browser tab. click on the RELOAD button. The workspace would be uploaded to their respective location.
-
Go to Jupyterlab tab in the browser. Right-click the uploaded zip file present in the file browser and choose delete to remove the zip file for memory management.
Import a library🔗
-
Open Jupyterlab from Modelon Impact through the Apps menu (as shown) in the upper right corner of the browser window.
-
The left sidebar in Jupyterlab contains a file browser. Create a new folder inside
impact/released_projects -
Upload the Zip (compressed library) or .mol file in the file browser of jupyterlab window by dragging and dropping files.
-
The zip file will be uploaded to the
impact/released_projects/<New Folder> -
Unzip the uploaded zip file using the following command in jupyterlab terminal
unzip <library_name> -
Open terminal and add command
chmod -R 777 <library_name> -
Navigate to the main Modelon Impact window opened in another browser tab and open Workspace Management page
-
Under workspace tab click Edit and search for unzipped (.Zip or .mol) files which is more than 100 MB imported via jupyterlab
Impact GUI has a limitation on uploading workspace/library/package which is greater than 100 MB.
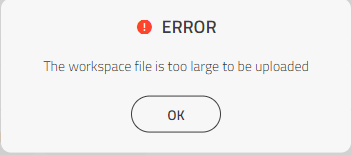
On many occasions, the size of the library or workspace or package is more than 100 MB. Attempting to upload such files through Modelon Impact GUI results in an error dialog to appear.

For file size more than 100 MB, use only impact directory to import the workspace/library/package
How to import via directory🔗
Compress the workspace/library/package into a .zip file. The zip archive must have the same name as the workspace/library/package. Make sure the zip file for library/workspace/package is as per the respective Impact directory structure.
Import a workspace🔗
- Open impact directory from
c:/users/username/impactand open the workspace folder - Create a new folder inside
c:/users/username/impact/workspacesand paste the .zip file inside the created folder which is more than 100 MB file size - Unzip the pasted zip file inside
c:/users/username/impact/workspaces/workspacename - Right-click the uploaded zip file present in the file browser and choose delete to remove the zip file for memory management.
- Reload the Modelon Impact window, open the workspace on which the 100 MB file is uploaded in the directory.
Import a Package🔗
- Open impact directory from
c:/users/username/impact/workspaces/workspacename/model_libraries/editable - Paste the .zip file inside the editable folder which is more than 100 MB file size
- Unzip the pasted zip file inside
c:/users/username/impact/workspaces/workspacename/model_libraries/editable - Right-click the uploaded zip file present in the file browser and choose delete to remove the zip file for memory management.
- Click on the reload button in the pop up and check the uploaded package is displayed under editable section.
Import a library🔗
- Open impact directory from
c:/users/username/impact/workspaces/workspacename/model_librariesa - Create a folder
read_onlyinsidec:/users/username/impact/workspaces/workspacename/model_librariesand paste the .zip file inside the read_only folder which is more than 100 MB file size - Unzip the pasted zip file inside
c:/users/username/impact/workspaces/workspacename/model_libraries/read_only - Right-click the uploaded zip file present in the file browser and choose delete to remove the zip file for memory management.
- Click on the reload button in the pop up and check the uploaded library gets displayed under read-only section.
Related articles🔗
Download | Upload | Delete | Resource File | Import FMU | Import Workspace